

 Authenticate
 Manage Users
 Customize
 Platform
How authentication works
- The user initiates login in your application.
- The application sends an authentication request to Keycloak.
- Keycloak identifies the user as an enterprise user and routes the request to Auth0 B2B Connect.
- Auth0 B2B Connect sends an authentication request to the user’s enterprise identity provider (for example, Okta or Microsoft Entra ID) using SAML or OpenID Connect (OIDC).
- The user authenticates with their corporate credentials at the enterprise identity provider.
- The enterprise identity provider returns a SAML assertion or OIDC token to Auth0 B2B Connect.
- Auth0 B2B Connect performs domain discovery and returns the federation result to Keycloak.
- Keycloak issues a token to the application.
- The application validates the token, bootstraps its session, and grants the user access.
Prerequisites
- An Auth0 tenant with B2B Connect - Enterprise enabled
- An Auth0 Organization with domain discovery enabled to an enterprise connection (for example, Okta). To learn more, read Create Organization Domains.
- Keycloak server with administrator access
- A realm configured in Keycloak for your application
- Identity provider mappers configured as required for your application
Configure Auth0 B2B Connect
To create a new B2B Connect integration:- Navigate to Auth0 Dashboard > Applications > B2B Connect and select +Create Integration to start the B2B Connect wizard.
- Enter an Integration Name (for example, “Keycloak Production”).
- Under Integration Type, select Third-party Managed Authorization Server.
- Select Save And Continue.
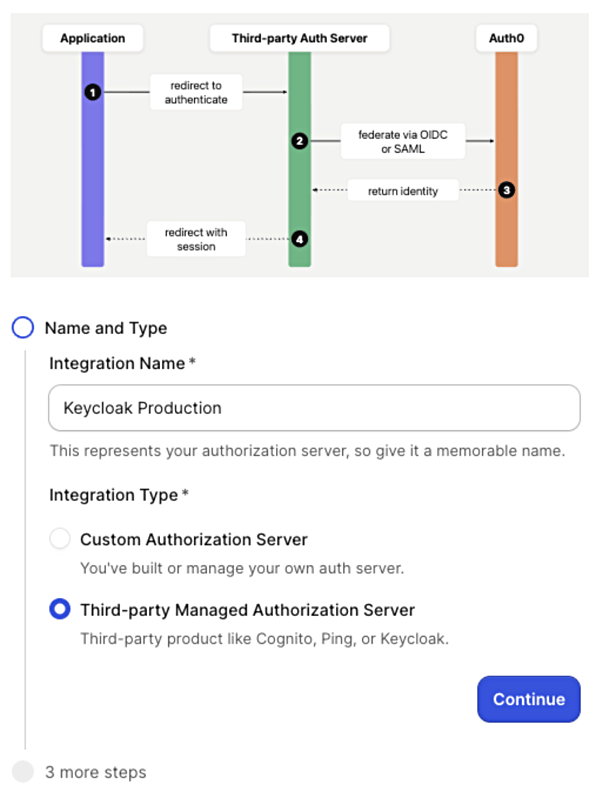
Select and configure the authentication protocol
In the wizard, you have the option of OIDC or SAML. Select your authenication protocol and follow the configuration steps.- OIDC
- SAML
-
Enter the Application Callback URL. This is your Keycloak broker endpoint, following this format:
Replace
YOUR_ALIASwith the identity provider alias you want to use in Keycloak (for example, “oidc”). - Select Save And Continue.
- On the confirmation screen, select Done to finish the wizard.
Copy credentials from the Settings tab
After the setup wizard completes, navigate to the Settings tab on the integration page. Copy the following values for use during your Keycloak setup:- Client ID
- Client Secret
- Issuer URL
Configure Keycloak
Add an identity provider
In the Keycloak Admin Console, select your realm and go to Identity providers in the left sidebar. Under User-defined, select:- OpenID Connect v1.0
- SAML v2.0
- OIDC
- SAML
- Set the Alias to the value you used in the Application Callback URL in Auth0 (for example, “oidc”). The Redirect URI at the top of the form is auto-generated from this alias.
- Set a Display name (for example, “Sign in with SSO”).
- In the Discovery endpoint field, enter your Issuer URL from the B2B Connect Settings tab followed by
.well-known/openid-configuration(for example,https://YOUR_TENANT.auth0.com/.well-known/openid-configuration). - Enter the Client ID from the B2B Connect Settings tab.
- Enter the Client Secret from the B2B Connect Settings tab.
- Leave Client authentication as the default. The Client Secret is sent in the request body.
- Select Add.
- In the provider’s settings page, scroll to OpenID Connect settings and expand the Advanced section.
- Enable Pass login_hint.
Set up Home Realm Discovery
Auth0 recommends Home Realm Discovery (HRD) set up using Keycloak Organizations to automatically route enterprise users to Auth0 based on their email domain.Route users with HRD example
To route all users with@acme.com emails to Auth0 B2B Connect:
- Go to Configure > Realm settings and enable the Organizations toggle.
- Select Save.
- In the left sidebar, go to Organizations and select Create organization.
- Enter a Name (for example, “AcmeCorp”), set the Domain to
acme.com, and select Save. - Go to the Identity providers tab and select Link identity provider.
- Select the Auth0 identity provider from the dropdown.
- Under Domain, select the domain you added (for example,
acme.com). - Enable Redirect when email domain matches.
- Select Save.
@acme.com email logs in, Keycloak automatically redirects them to Auth0 B2B Connect for authentication.
Verify the identity provider
- Open your application’s login page.
- Verify the identity provider button appears with the display name you configured.
- Select it and confirm you are redirected to your identity provider’s sign-in page.